Aizysse Baga · 80mm mini-CD EP with CD+G and CD+EG
Artist
Aizysse Baga
Released
2026
Format
80mm mini-CD EP, CD+G and CD+EG, 5 tracks
Runtime
17:12
UPC / EAN
9 91043 61604 7
Production
Adélaïde Sokolov and Aizysse Baga
Recording Studio
Teenage Wasteland (Montréal, QC)
Photography
Piscenis
Mastering
Antoine Rotondo for Duke Mastering
Manufacturing
Duplication.com
Tracklist
Neon Sound · with Rita Baga · 3:39 · CBHBN2600001
Nightmare (Divacore Remix) · 3:33 · CBHBN2600002
Game Over · with J4DE · 3:22 · CBHBN2600003
Moonlight · with Kiara · 3:03 · CBHBN2600004
Top Modèle (Divacore Remix) · 3:35 · CBHBN2600005
Get the disc
A limited pressing of 75 copies of the 80mm mini-CD, mailed from Montréal. $10 CAD + $15 CAD shipping worldwide. One per person, please.
Secure checkout through PayPal. Pay by card without a PayPal account.
The record
Aizysse Baga is a talented drag queen from Montréal and a dear friend of mine. Together we recorded and produced Divacore, a five-track EP, in our hometown at the Teenage Wasteland studio, and we had the honour of three guest collaborators joining us on it. To celebrate, we decided to press a promotional item: a mini-CD, the adorable 3-inch (80mm) format that was popular in the 1990s for releasing singles.
Our Mini CD contains NO files; it's a genuinely, certifiably real Audio CD that plays just as happily in your boombox as in your car, and shows up as exactly that on your computer.
To be clear about what this is not, because it does trip people up: it is not a "hybrid" disc, the kind that puts a separate data track alongside the audio tracks. There is no data track on it anywhere. It is simply an ordinary Audio CD, nothing more.
What if I told you that if you slip it into a compatible machine, like an old video game console, a slideshow appears on your screen? It's all true: depending on the hardware you're using, our EP will display images in either 16 colors or 256 colors while it plays. This is thanks to a fully official extension of the Audio CD called CD Graphics (CD+G), and even its rarer successor: CD Extended Graphics (CD+EG)!! On an ordinary computer or car stereo, though, you'll just get the music (and maybe the track titles); the pictures need a real CD+G player, like an old karaoke machine or one of the vintage consoles that can decode it. Take a look below:
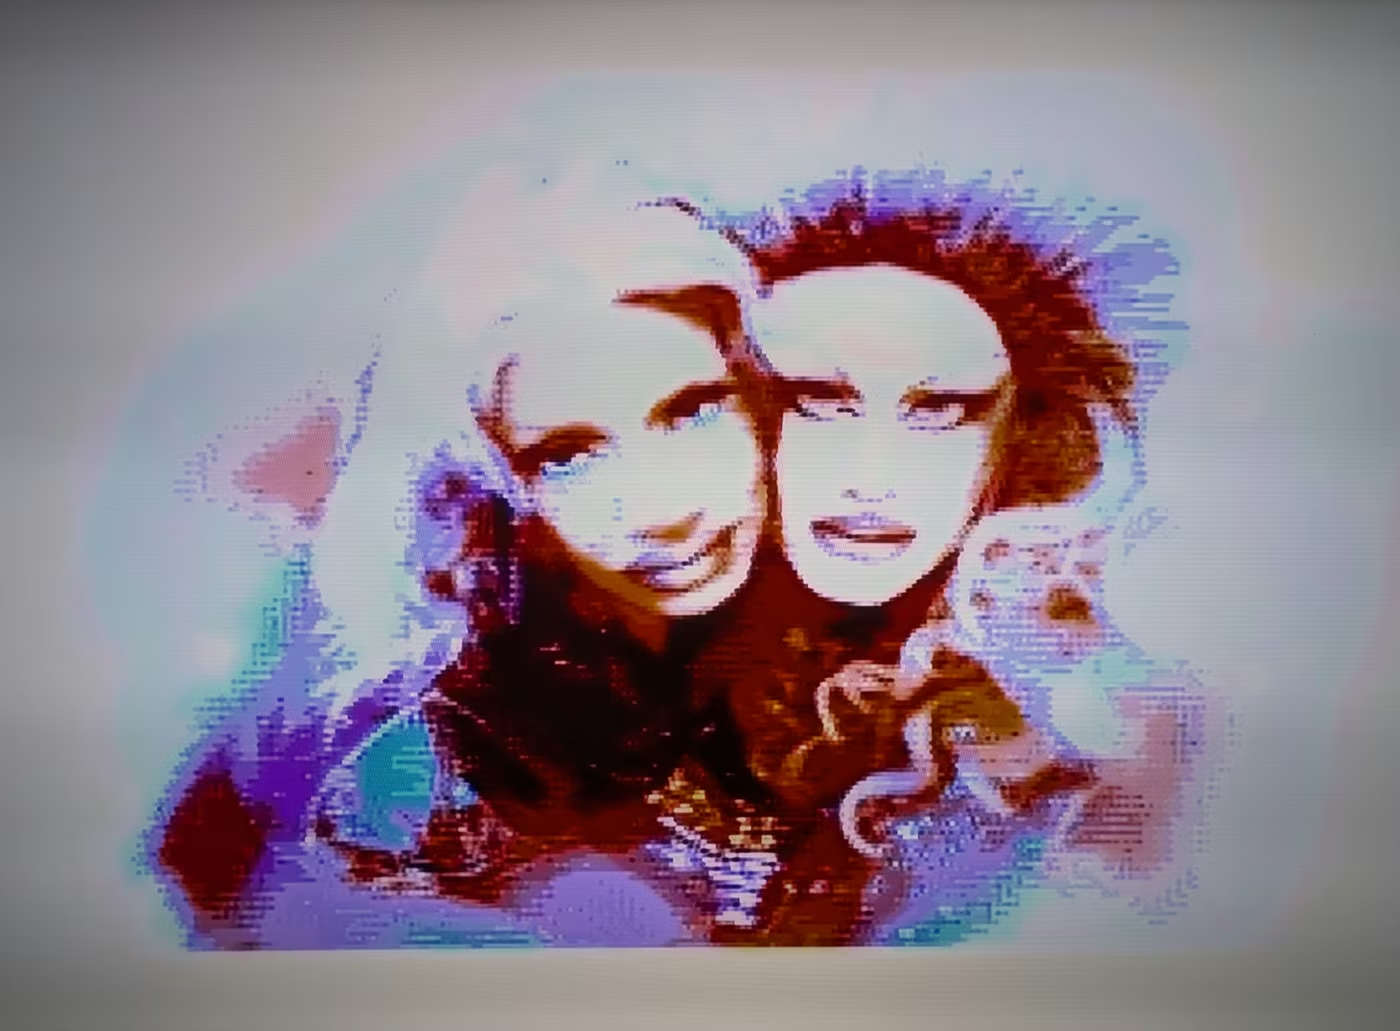
One frame straight off the disc: 16-color CD+G (left) and 256-color CD+EG (right).
Proof that a technical limitation won't stop queer beauty from prevailing.
Before we dive in, here's the whole trick in one breath: a CD carries a tiny hidden lane running right next to the music, not a separate track; we filled it with pictures, at no cost to the music; some machines know how to show them. That's it, that's the magic. The rest of this page explains how, and fair warning, it gets nerdy. Gloriously so.
The hidden lane: subcodes
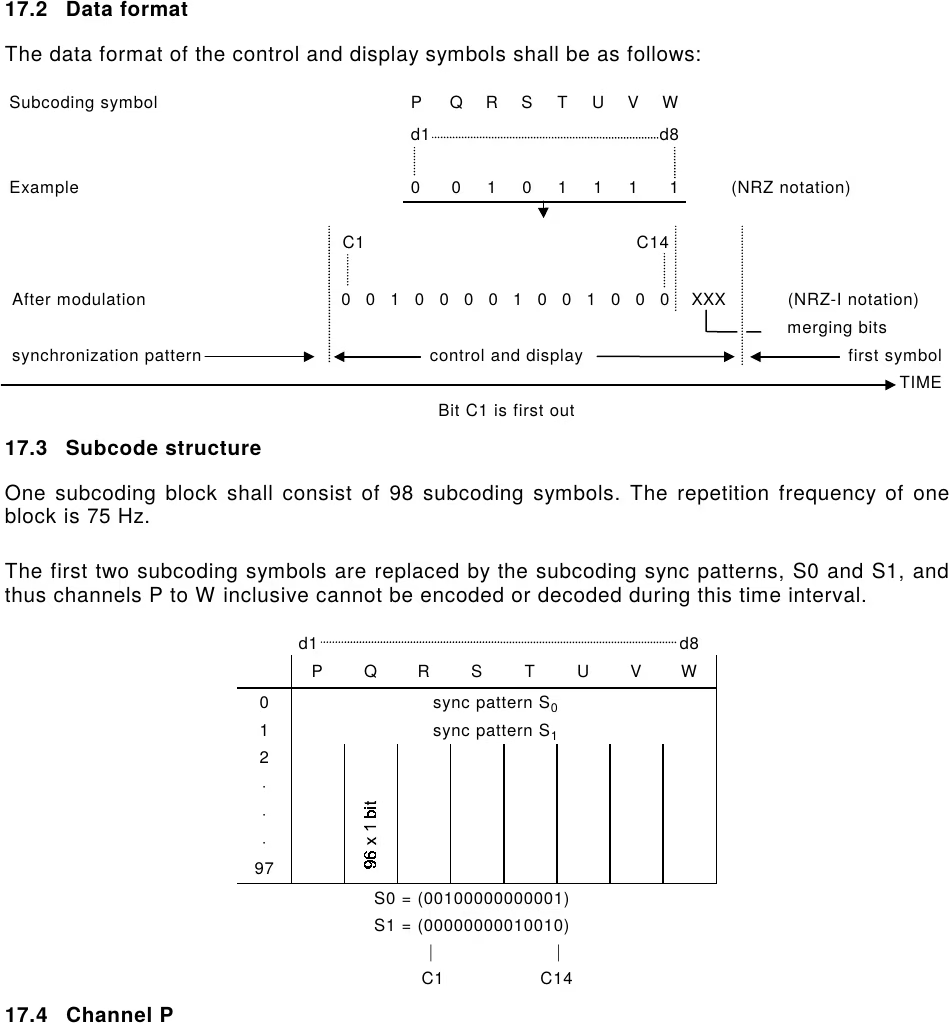
How is this possible? An Audio CD stores its music as 16-bit, 44.1 kHz digital audio. Riding right alongside that music is a second, far smaller stream of data: the subcode. It is tiny. At any instant it is only 8 bits wide, one bit on each of eight channels named P through W. Two of those channels do the housekeeping: channel P marks where each track begins, and channel Q carries the running time and track numbers (the readout on your CD player) plus things like the disc's catalog number. The other six, R through W, were left empty in the original Audio CD design: reserved, held at zero, waiting for someone to find a use for them. And at first, almost nobody did. And that's where CD Graphics comes in.
One frame on the disc, straight from IEC 60908 (Figure 8): 24 bytes of audio data, 8 bytes of error-correction parity that guard that audio, and just one byte of subcode, all riding side by side (plus a sync pattern up front). That lone subcode byte, labeled "control and display symbol," is the entire hidden lane.
Because that subcode byte rides in every frame, right beside the audio and never in place of it, the graphics cost zero audio time: our 17 minutes stay 17 minutes. Nothing is competing for space.
But isn't this a hybrid disc, then? When people reach for "hybrid" they usually mean one of two real formats, and we are neither. A mixed-mode disc carries an actual data track sitting next to the audio tracks. An Enhanced CD (also sold as CD-Extra or CD-Plus) carries a whole second session, a separate data area burned in after the music. Our disc has neither: no data track, no second session, nothing bolted on at all. The graphics ride in the subcode, and the subcode is not an addition; it is part of the physical structure of every Audio CD ever pressed, eight channels present in every single frame whether anyone fills them or not. We just stopped leaving six of them empty. So to your computer, quite correctly, the disc is nothing but an ordinary Audio CD.
1985: six idle channels get a job
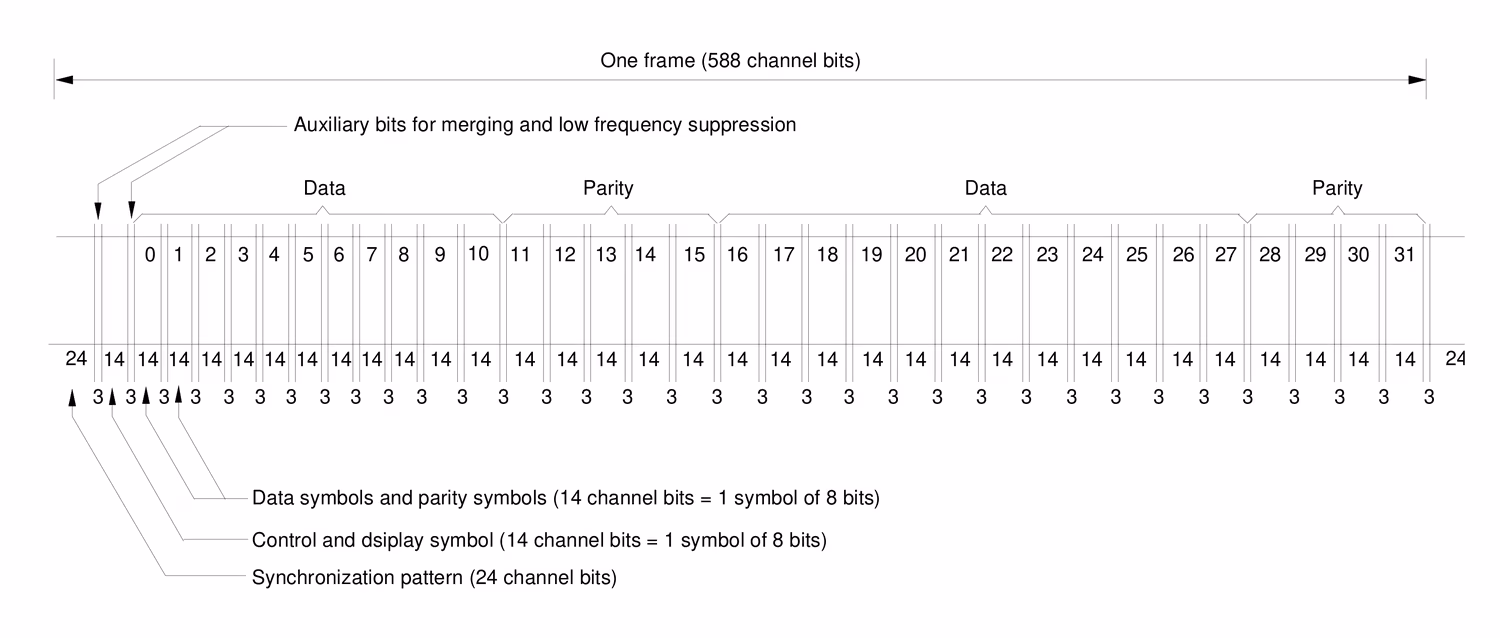
The official Red Book standard, the document that lays out how to build and encode an Audio CD, was updated circa 1985 to add a new mode: TV-Graphics, better known as CD+G, aka CD+Graphics. The idea is to take those unused RW subcodes and finally put them to work. Read together, the six R-to-W bits of each subcode byte form one 6-bit symbol. Those bytes are grouped into blocks of 98 (the block pictured just below), and the first two bytes of each block carry sync patterns, which leaves 96 usable symbols per block. At 75 blocks per second, 75 x 96 x 6 works out to 43,200 bits per second: a raw 43.2 kbit/s.
From IEC 60908, clause 17. Top: a single subcode byte, its eight bits spread one per channel across P to W. Bottom: a block of 98 of those bytes (75 blocks a second); the first two slots are taken by the sync patterns S0 and S1, which is why only 96 are left to carry data.
You group those symbols into packs of 24 (a PACK, 144 bits), and four packs into a PACKET (576 bits, which is exactly one subcode block), and that's your data format. The subcode doesn't get the heavy CIRC error correction that shields the audio, but it carries its own lighter armor: a (24, 20) Reed-Solomon code plus eightfold interleaving, with an extra (4, 2) code for the first two symbols of every pack. (When a disc gets burned, the drive itself computes and fills in those parity bytes.) That protection is roughly on par with one of CIRC's two layers. Once you subtract the parity room and the command overhead, the usable graphics payload lands at about 28.8 kbit/s.
So where does that 28.8 come from? Take one PACK, those 24 symbols, and look inside: only part of it is your picture. One symbol is the command (the MODE and ITEM that announce "this is TV-Graphics"), one is the instruction (what to actually do: write a font, set a color, scroll the screen), six are for error correction. That leaves 16 symbols of real graphics data. So out of every 24 symbols, 16 carry your image, which is 16/24 of the raw 43.2 kbit/s, or 28.8 kbit/s.
Figure 20: the inside of one PACK. Command, instruction, parity, and 16 symbols of data.
Tiles, 16 colors, and one sneaky XOR
The idea behind CD+G: you stream tiles, 6 pixels wide and 12 pixels tall, onto a 288 x 192 screen, wrapped in a border one tile thick on each edge (6 pixels left and right, 12 pixels top and bottom), which brings the full page to 300 x 216; that ring is staging room for the format's smooth-scrolling tricks. You get a palette of 16 colors of your own choosing, each one a 12-bit color (4 bits each of red, green, and blue), and since a pixel only has to pick one of those 16, every pixel is just 4 bits. You get a command to load the palette, a command to pick the screen's background color from that palette, a command to draw a tile at a spot on the screen, and an XOR command to flip the contents of a tile, which we'll come back to later. There are other commands, but these are the ones that matter here.
So that comes to 768 tiles for a full screen. Each tile can only be drawn with two colors from the palette. You're going to think that's a problem? Well, no: it's just a limit that comes from the size of the PACKS, and there's a command that lets you alter a tile you've already drawn: the XOR command. Each pixel holds a color number from 0 to 15, and instead of painting a new color on top, XOR combines the number already sitting in that pixel with a new number you hand it (a bit-by-bit exclusive-or). Do that up to 3 times on the same tile and you can end up with all 16 colors living in a single tile! It works because each pass can contribute one of the pixel's 4 bits: the base write lays down the first bit of every pixel's color number, and each XOR layers in another, so the base write plus three XORs can build any 4-bit value, anywhere in the tile.
The CD+G page: 50 x 18 tiles of 6 x 12 pixels. Hatched ring: the one-tile scroll border. Yellow: the visible 288 x 192 screen. Cyan: one tile.
What one full picture costs
In theory, then, to put a whole picture on screen you clear the whole memory with 16 preset-memory packs (the spec wants that instruction repeated 16 times), set the border with one pack, load the palette with two packs, and then draw the tiles: 1 base command plus up to 3 XOR commands each, so up to 4 commands per tile. In the absolute worst case, with all 768 tiles needing their full four packs, that is up to 3,072 tile commands, and with the 19 setup packs in front of them (16 preset-memory + 1 border + 2 palette) you get up to about 3,091 commands in all for one full 16-color screen, which at a maximum of 300 commands per second (75 packets per second, 4 packs each) is just over 10 seconds. In practice it is far less, since any pass that would write nothing and any tile that is pure background gets skipped.
Surviving the skip button
But let me say it again: the picture itself is not stored in a file. It's a stream of data, read at the same time as the Audio CD. If a listener skips forward or backward, there's no way to recover what went by earlier. It means that if the player skips the palette-definition packs, absolute nonsense shows up on screen, and only part of the image. So we planned things around that. We re-send the palette and border (but never the screen-clear, which would erase the picture) every so often. For us that goes out about once a second. We also decided the picture on screen is redrawn perpetually, tile by tile, on a loop, using absolute writes that land on the right value no matter what was there before. That way, even if you join mid-draw and the image is still incomplete, its colors are already correct! Obviously it slows things down a little: while a picture draws we keep slipping those refresh packs in, about three a second, the border plus the two palette packs. Across the ten-second worst case that is only about 30 extra packs, so about a tenth of a second. No big deal in itself, it just buys some protection.
Picking 16 colors that do a photo justice
So, in theory, we can run our slideshow alongside the audio, and fairly robustly at that. That said, the format was built for karaoke lyrics and pretty simple graphics. Showing that in 288 by 192 pixels, in only 16 colors, could be plenty back in 1986 on a 13-inch TV wired up over composite, with the CRT softly blending everything together, sure. But for real photographs, let's be honest, it's a brutal little box to work in, and things can turn ugly fast. Which would be a shame, because our drag queens are absolutely stunning and the photographer did some seriously advanced color work. How do you make all of that look at least halfway decent inside such a tiny budget... oof, what a headache. Let's start with the hardest part: for a given photo, choosing the best possible 16-color palette with only 4 bits per channel.
So how do you choose the best 16 colors for a real photo? It turns out we can obtain a fairly solid answer by using three well-known techniques stacked together.
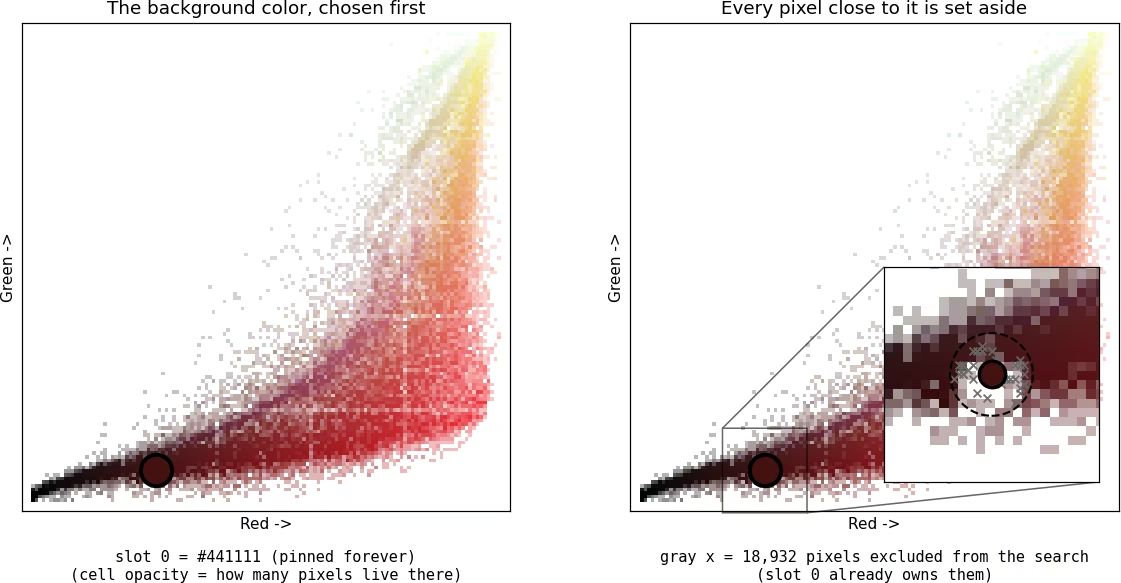
The very first color of our palette is the background color, picked ColorArt-style. We have to thank Wade Cosgrove for having reverse-engineered this method out of iTunes 11 (it's what picked the wall color behind album covers back then). What it does: look only at the photo's outer edge, sort those edge pixels into a handful of piles of similar colors, and take the biggest pile. Whatever color shows up the most around the rim of the photo, that's our background. It gets permanently locked into slot 0 of the palette, so the empty border around the picture never costs us one of our precious 16. On Aizysse's cover the rim is deep red, so slot 0 becomes #441111. (Two small exceptions: if the winner is plain black or white but a real color is also strong at the edge, we prefer the color; and if the edge is almost entirely near-black, we just go pure black, which lets the encoder skip all the empty tiles for free.)
The cover's pixels plotted in color space. Left: the background color, chosen first and pinned. Right: every pixel close to it is set aside; slot 0 already owns them.
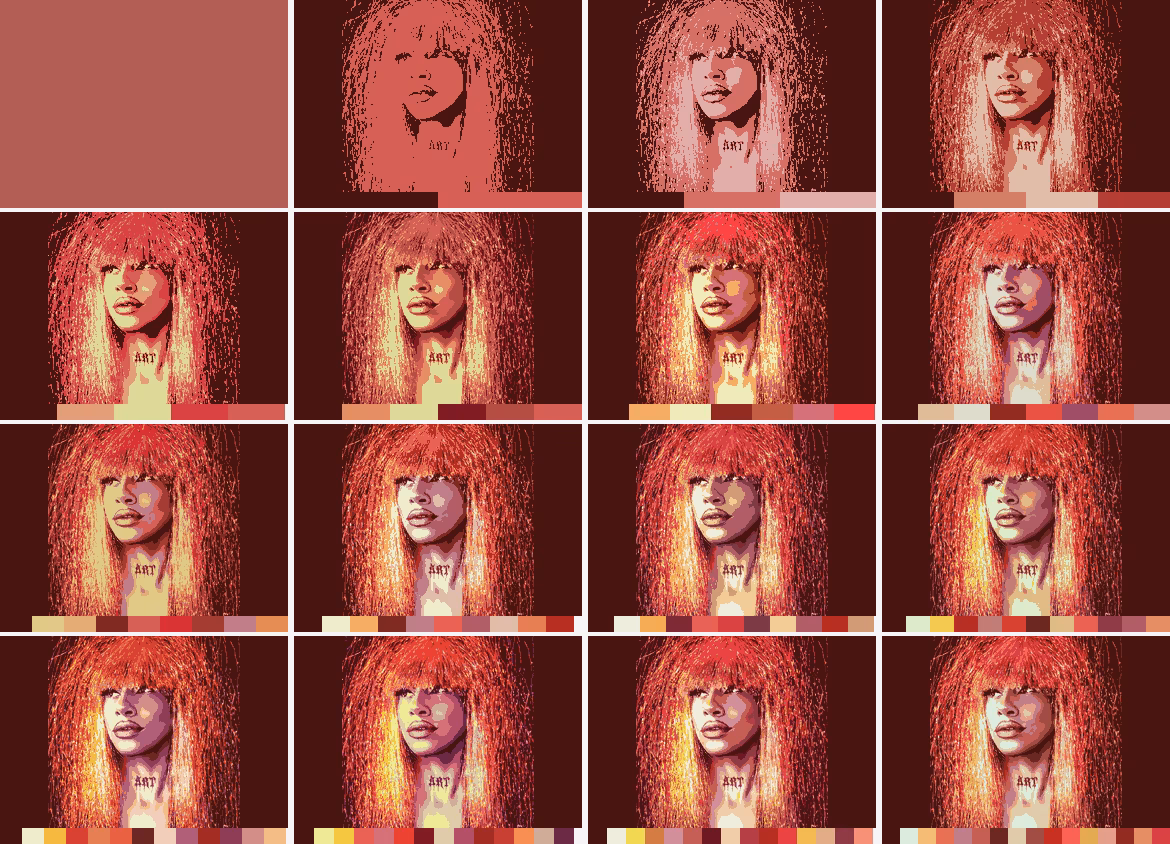
For the other 15 colors, we found our answer in tiledpalettequant, an open tool by a programmer who goes by rilden, built for exactly this tile-and-palette problem on old consoles. It is a form of vector quantization from the LBG family, named after Linde, Buzo and Gray, who published it in 1980, in a one-split-at-a-time variant (the textbook version doubles all the colors at once). What it does: imagine every color of the palette claims the pixels of the photo that look most like it; that little kingdom of pixels is called its cluster. A color is doing a good job when its pixels all look close to it, and a bad job when they're all over the place. So we start with just one color, the average of the whole photo, which of course does a terrible job of representing everything alone. Then we repeat one simple move: find the color doing the worst job, and split it.
And the split itself is a neat trick. We don't decide where the two halves go; the pixels do. The color is duplicated into two twins sitting a hair apart (one gets a microscopic random nudge, only there so the two aren't mathematically identical, or they'd move in lockstep forever). Then pixels are drawn one at a time, each one lands on whichever twin is the tiniest bit closer, and that twin gets pulled a step toward it. So a slightly-redder twin catches a red pixel, becomes slightly redder still, and catches even more red pixels next time: a tiny difference snowballs until each twin has camped on a genuinely different shade hiding inside the old kingdom.
The pixels split themselves along their real divide, which is rarely a tidy half-and-half (on Aizysse's cover, the first split breaks roughly 70/30, dark reds on one side, pale pinks on the other). Each pass simply runs a fixed budget of pixel draws and then stops; whatever settling remains is finished by the passes still to come. Repeat the whole move until there are 16 colors. The beauty of it: every new color goes exactly where the picture is most wrong right now, so a big flat background never hoards palette slots while a small, detailed face is left starving.
The first steps on the cover: the average of what's left, then split after split. The faint circle is the parent color; the dashed lines lead to its two twins. Cell opacity shows how many pixels live there.
You might notice in these figures that the first colors all rush toward the bright side of the cloud and seem to snub the dark pixels. That's the scoring at work: the dark pixels huddle in a tight little line near black, all looking alike, so the pinned background color already serves them rather well; the bright side, by contrast, is sprawled across a huge range, and that's where the error piles up. The dark shades get their own colors too, just later, once the expensive regions are covered.
And to make it all settle nicely, the colors are constantly refined with online k-means, using the update James MacQueen described back in 1967. What it does: show the palette one pixel at a time, find which color that pixel belongs to, and nudge that color a tiny step toward the pixel. Pixel after pixel, each color slowly drifts to the true center of its own little kingdom, like a tent pole finding the middle of its tent.
On top of that, we run ten cleanup passes: each one looks for a color that has become nearly useless (its pixels would barely notice if it disappeared) and re-assigns it to the most overcrowded region instead, keeping the change only if the result is measurably better. And then we do the entire build five times from five different starting points, and keep the best of the five. "Better" and "best" are not a matter of taste here: we score every palette with a single number, the total distance between each pixel of the photo and the nearest palette color (weighted the way the human eye sees: green counts most, blue least). Lowest score wins. (The pinned background slot, the final low-rate polish and the five-restart contest are our own additions on top of rilden's recipe.)
From 1 color to 16, each step splitting the worst cluster, with the palette growing underneath.
Dithering: getting the skin back
Now, all of this is very pretty (gorgeous, even), but it gives our image a bit of a cartoon look: big flat patches of a single color where the original had smooth gradients. The fix is dithering: mixing tiny dots of different palette colors so that, from a normal viewing distance, your eye blends them into shades the palette doesn't even have. It's the same trick newspapers used to print photos with nothing but black ink. After testing different algorithms, the one that gave us the best results is the "slow" dither from rilden's tiledpalettequant, an ordered dither (the dots follow a fixed checkerboard-like pattern, here a small 2x2 diagonal one) with a twist of error diffusion. What it does: for each pixel, instead of keeping only the closest palette color, it lines up four good candidates, each one chosen to make up for what the previous one got wrong (too pink? the next leans the other way). Then the pixel's position in the checkerboard decides which of the four it gets. Neighboring pixels make slightly different picks, the picks interleave, and the flat patches dissolve into texture: the photo gets its skin back. Look at the two side by side: same 16 colors in both, the only difference is the dither.
Same 16 colors in both: palette only (left) and the slow dither (right).
Burning it all to disc
So, there we have it: we've got our image, and we know how to encode it! For our slideshows, we decided that each picture appears on screen tile by tile (about 10 seconds at the very most, usually much less), stays up for 30 seconds, and is then erased the same way it came: each tile replaced one by one, top-left to bottom-right, with the solid background color, before moving on to the next picture, looping for the whole length of the track.
One last detail before the laser fires: the audio itself. Antoine delivered our masters as 24-bit files, and an Audio CD holds exactly 16 bits per sample, so eight bits have to go. Simply chopping them off would let the rounding errors track the music and add a faint, unpleasant grit, so the conversion is dithered too: a whisper of noise is mixed in so the errors stay random. And that noise is shaped with a Shibata filter, from Naoki Shibata's SSRC converter, whose curve is fitted to the absolute threshold of hearing, the quietest sound the ear can detect at each frequency: the quantization noise gets tucked exactly where you're least equipped to hear it. Same trick that got our queens their skin back, applied to sound instead of pixels: our little EP is dithered twice over, once for your eyes, once for your ears.
And so, for each tune, we generate our list of CD+G commands and turn them into RW subcodes. Then it's burning time, and our weapon of choice is cdrdao, the venerable Linux burning tool, because it's one of the few that lets you write the subcode yourself. For every track, we merge the music and the graphics into one .bin file, sector by sector: a CD sector is 1/75th of a second, so each one gets its 2,352 bytes of audio plus its 96 bytes of RW subcode, neatly interleaved. A small .toc file then describes the whole disc to cdrdao: the track list, where each .bin lives, and even the CD-TEXT (album title, artist, track names) that hides in the disc's lead-in, plus each track's ISRC tucked into the Q channel. One cdrdao write command later, the laser lays it all down, music and pictures sharing the very same spiral. And it works!! Just look at the result playing on a CD+G-capable machine, and tell me honestly that it's gorgeous. Because it is. Oh yes!
The 16-color CD+G picture on a perfectly ordinary CD+G player, a Memorex karaoke machine. Photos by Adam Gashlin.
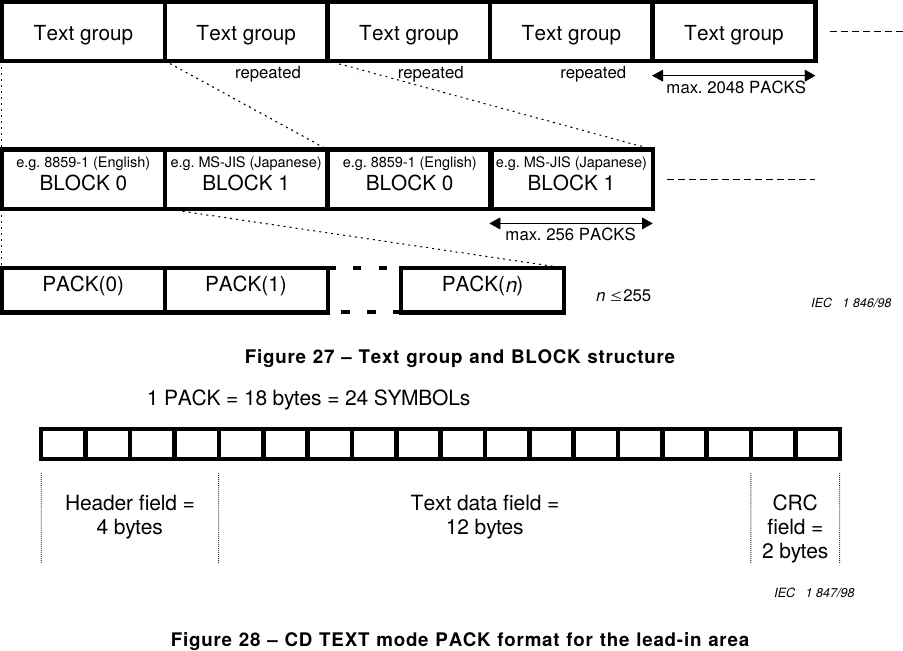
An aside! Did you know that, much like the audio files on your computer, you can embed metadata right into an Audio CD?! From early on, a standard Audio CD could already carry each track's ISRC, the recording-industry identifier, tucked into the Q subcode channel. But circa 1996, Philips and Sony gave the subcodes a far bigger metadata vocabulary, with a very precise spec of its own: CD-TEXT. Like CD+G, it lives in those RW subcodes. You can store the song titles, the artists, the album name, its UPC, even in several languages at once! It usually sits in the subcodes of the disc's lead-in area, where there's roughly five kilobytes of room, though it can also be stored during the tracks themselves, which almost nobody ever does in practice. As for us, since cdrdao writes the CD-TEXT into the lead-in for us, adding it was a breeze! And that's how your car stereo or your boombox can display the CD's song titles without ever fetching them from the Internet.
From the standard: the CD-TEXT text-group structure, and its PACK format (Figures 27 and 28).
The rabbit hole: CD+Extended Graphics
Our Queens are now on your screens, in all their splendor and beauty, while their song plays in the best quality the format allows. That's a hidden bonus for any listener who slips our Mini CD into their old game console, and to our knowledge, possibly the only commercial mini-CD of the 21st century carrying both CD+G and CD-TEXT! (Easy claim, sure, it's extremely niche and the format has been dead for ages, but let us queer engineers enjoy our little victories.) And we were going to leave it there. Then we heard about the CD+Extended Graphics standard on Wikipedia.
Circa 1991, it turns out, the Red Book got updated once more to define an EXTENDED TV-GRAPHICS mode! Same resolution as CD+G, but 256 colors this time, and, it seemed, possibly backward compatible with plain CD+G!! When we read that, we wondered how it worked and where it had ever been used. And then, cold shower. Wikipedia had warned us, to be fair. The format is defined, alright, but it's as if it had never been pressed onto any disc, and as if no machine on Earth could read it. We were about to drop it; what we'd built was already niche enough, and one does have to get dressed and go enjoy Montreal's nightlife at some point.
But that's when we stumbled onto extended.graphics, by Adam Gashlin. We learned that yes, real CD+EG discs were actually made and distributed: a tiny clutch of releases, mostly Japanese promos, with a handful of Korean karaoke discs and even a Chinese one surfacing since. Vanishingly obscure. But it exists. What a slap! But wait, we don't have a single machine that can read this stuff, how on Earth are we supposed to... well, hold on tight: we'd had one at home this whole time without knowing it. The Sega Saturn! I had absolutely no idea, and I wasn't the only one: the Saturn decodes CD+EG, and hardly anyone had ever seen it do so, because the discs themselves were nowhere to be found; the dump of one Victor demo disc a couple of years ago is what kicked off EG's rediscovery. Adam having kindly and generously agreed to share his rips of those demo discs, curiosity took over, and there I was, reading the Red Book and staring at the subcodes of those discs instead of going out to see my drag queen friends. Did I mention I was very officially diagnosed as autistic as an adult? Somehow it tracks.
Clause 23 of the standard: EXTENDED TV-GRAPHICS, "completely backward and forward compatible", built on two graphics memories.
Two formats, one trick more
Armed with the documentation, staring at rips of the real discs, and writing directly to Adam, we worked out that the two formats are actually quite similar: you send packs to initialize the screen (19 packs: 2 to set the memory mode, 16 to clear, 1 for the border), then more to define the 256-color palette (48 packs: the spec splits it into 32 "main" packs for the coarse bits and 16 "additional" packs for the fine ones), and then you push the image to the screen with tile commands... which, once again, only give you two colors per tile! So the XOR trick comes to the rescue once more, except this time a tile can hold up to 256 colors (well, okay, 72: the tile is still only 6 by 12 pixels, but you get the idea). A pixel now carries 8 bits instead of 4, so a tile takes up to 8 packs to draw (1 base write + up to 7 XOR passes), which lands a full screen at roughly 6,200 packs, just over 20 seconds.
And what about backward compatibility, you ask? Well, by studying the RW subcodes of the real CD+EG discs (because the official documentation is, let's say, not very chatty on the subject), you can see how it's done: send the initialization, then the CD+G palette, then the CD+EG palette, then draw each tile with the regular CD+G writes and XORs, and finally apply CD+EG XORs on top of that very tile to give it its missing colors! It's perfectly backward compatible, because CD+G machines simply ignore the CD+EG packs. Of course, it makes the drawing heavier. For one complete picture, that's 19 packs of init, 50 packs of palettes (2 CD+G + 48 CD+EG), up to 3,072 packs of CD+G tile drawing, and up to 3,072 CD+EG XOR packs on top: about 6,200 packs in all, 20.7 seconds at the absolute worst. But it works! With one limit to the method, though: the palette itself must also be made backward compatible for any of this to hold.
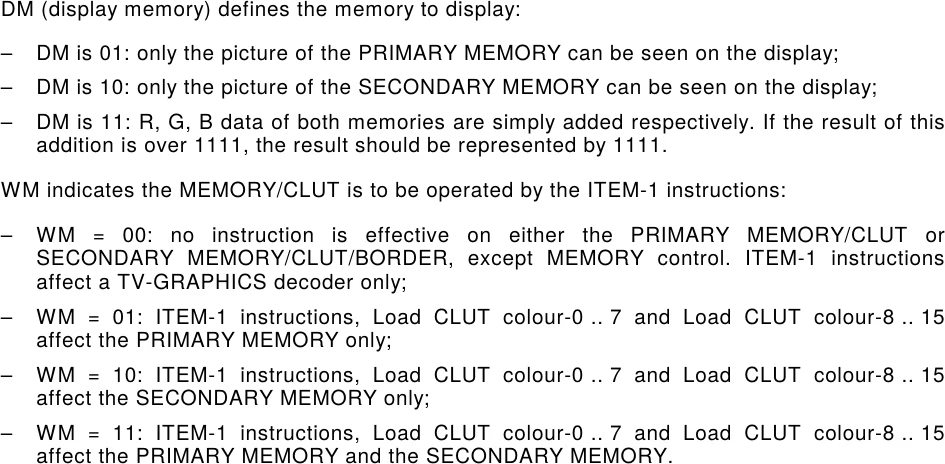
The machinery behind it, from clause 23: the DM and WM modes that route writes to the PRIMARY memory, the SECONDARY memory, or both.
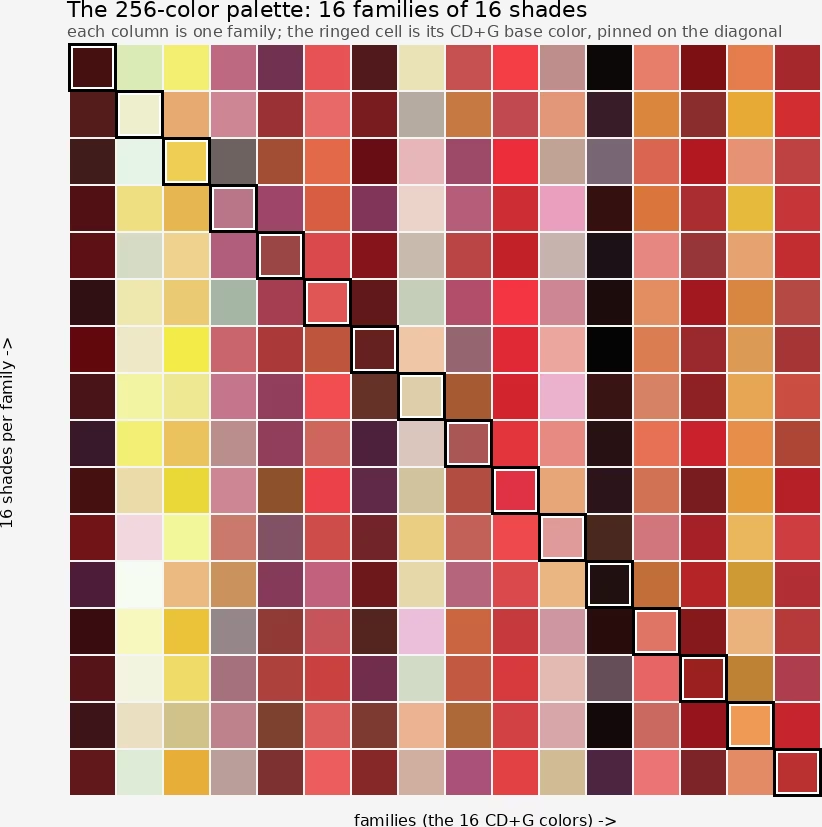
Why does the palette have to be backward compatible too? Because of how those XOR layers stack. In 256-color mode, a pixel's color number is 8 bits: the lower 4 bits are its CD+G color, and the CD+EG XORs only ever add the upper 4 bits on top. The lower half is untouchable, because that's exactly what a plain CD+G machine displays, and we promised not to break it. Which means a pixel that is CD+G color number 5 can only ever become one of the 16 entries of the 256 palette whose number is 5 plus a multiple of 16 (5, 21, 37, and so on). So we are not free to pick the best 256 colors for the photo and call it a day. Instead, the 256 palette has to be built as 16 families of 16 shades: first the 16 base colors that make a good picture on their own (that's the CD+G image), then 15 refined variations of each (base included, that makes 16 shades per family), and every pixel may only upgrade within its own family. A pixel in the "skin tone" family can pick among 16 finer skin tones; it can never borrow a shade from the "red hair" family. A free-for-all 256-color quantization would look a touch better, but it would scramble the picture on every CD+G player out there. That's the price of backward compatibility, and we happily pay it.
A palette of 16 families
So how do we pull that off? First, each of our 16 base colors gets one slot of the 256-color palette reserved and pinned for good, with 15 more slots set aside for its future shades. Now we have to fill them: for each base color, find the 15 variations of it that help the photo most. And for that, no new wizardry needed; we reuse the very same machinery as before, just run separately inside each family. Take the family's own pixels (the ones whose CD+G color is that base), scatter 15 candidate shades among them, starting them off where the base color serves those pixels worst, then let them settle onto the centers of their little crowds, with a few cleanup passes to recycle any shade that turns out useless. Sixteen small palettes of 16, each tuned to its own slice of the photo, and together they make a 256-color palette fully compatible with the 16-color one.
The cover's 256-color palette: each column is one family, and the ringed cell is its CD+G base color, pinned in place. (Our builder pins each base where the high four bits equal the low four, hence the diagonal.)
Then we still have to generate the 256-color image itself, with dithering of course, but it too must stay compatible with the 16-color image. Here again, same dither as before with one extra rule: at every pixel, the candidates may only be drawn from the 16 shades of that pixel's own family. The pixel is welcome to refine itself, never to defect to another family, and the leftover error still flows to the neighbors so they compensate. And there you have it: a 256-color image that is backward compatible with our 16-color image. Surprising, no? I mean, just look at the result!!
The cover, straight off the disc: the CD+G picture (left) and its CD+EG counterpart (right).
Charming, aren't they?
Burning it, for real this time
We modified our subcode generator to send the CD+EG packs after the CD+G packs. The protections we'd built stay in place too: the current picture is perpetually redrawn, tile by tile, in a loop, and the CD+EG palette is also re-sent from time to time to avoid corrupted drawings. For that last one, though, we send it less often than the CD+G palette, simply because it's much bigger, 48 packs against 2, and would eat into the drawing budget. We settled on re-sending it every 5 seconds in our case, which is plenty. We sent our CD image to Adam, and he was able to test it on the CD+EG machines he owns... and it works!! (Our first test image taught us a lesson along the way: the memory-control command has to be sent again after writing the 256-color palette, or the palette never takes effect, and the Saturn answers with delightfully weird glitches.) There, this time we're certain: we have created the world's first commercial Mini-CD carrying CD-TEXT, CD+G and CD+EG all at once, the whole thing perfectly backward compatible.
Adam Gashlin's photos of a Divacore test pressing decoded by his Sega Saturn: on a CRT television (top), and on a flat screen (bottom).
One disc, two pictures: what a CD+G player shows (left), and what a CD+EG machine like the Sega Saturn shows (right).
Raaaaaaah lovely queens are lovely.
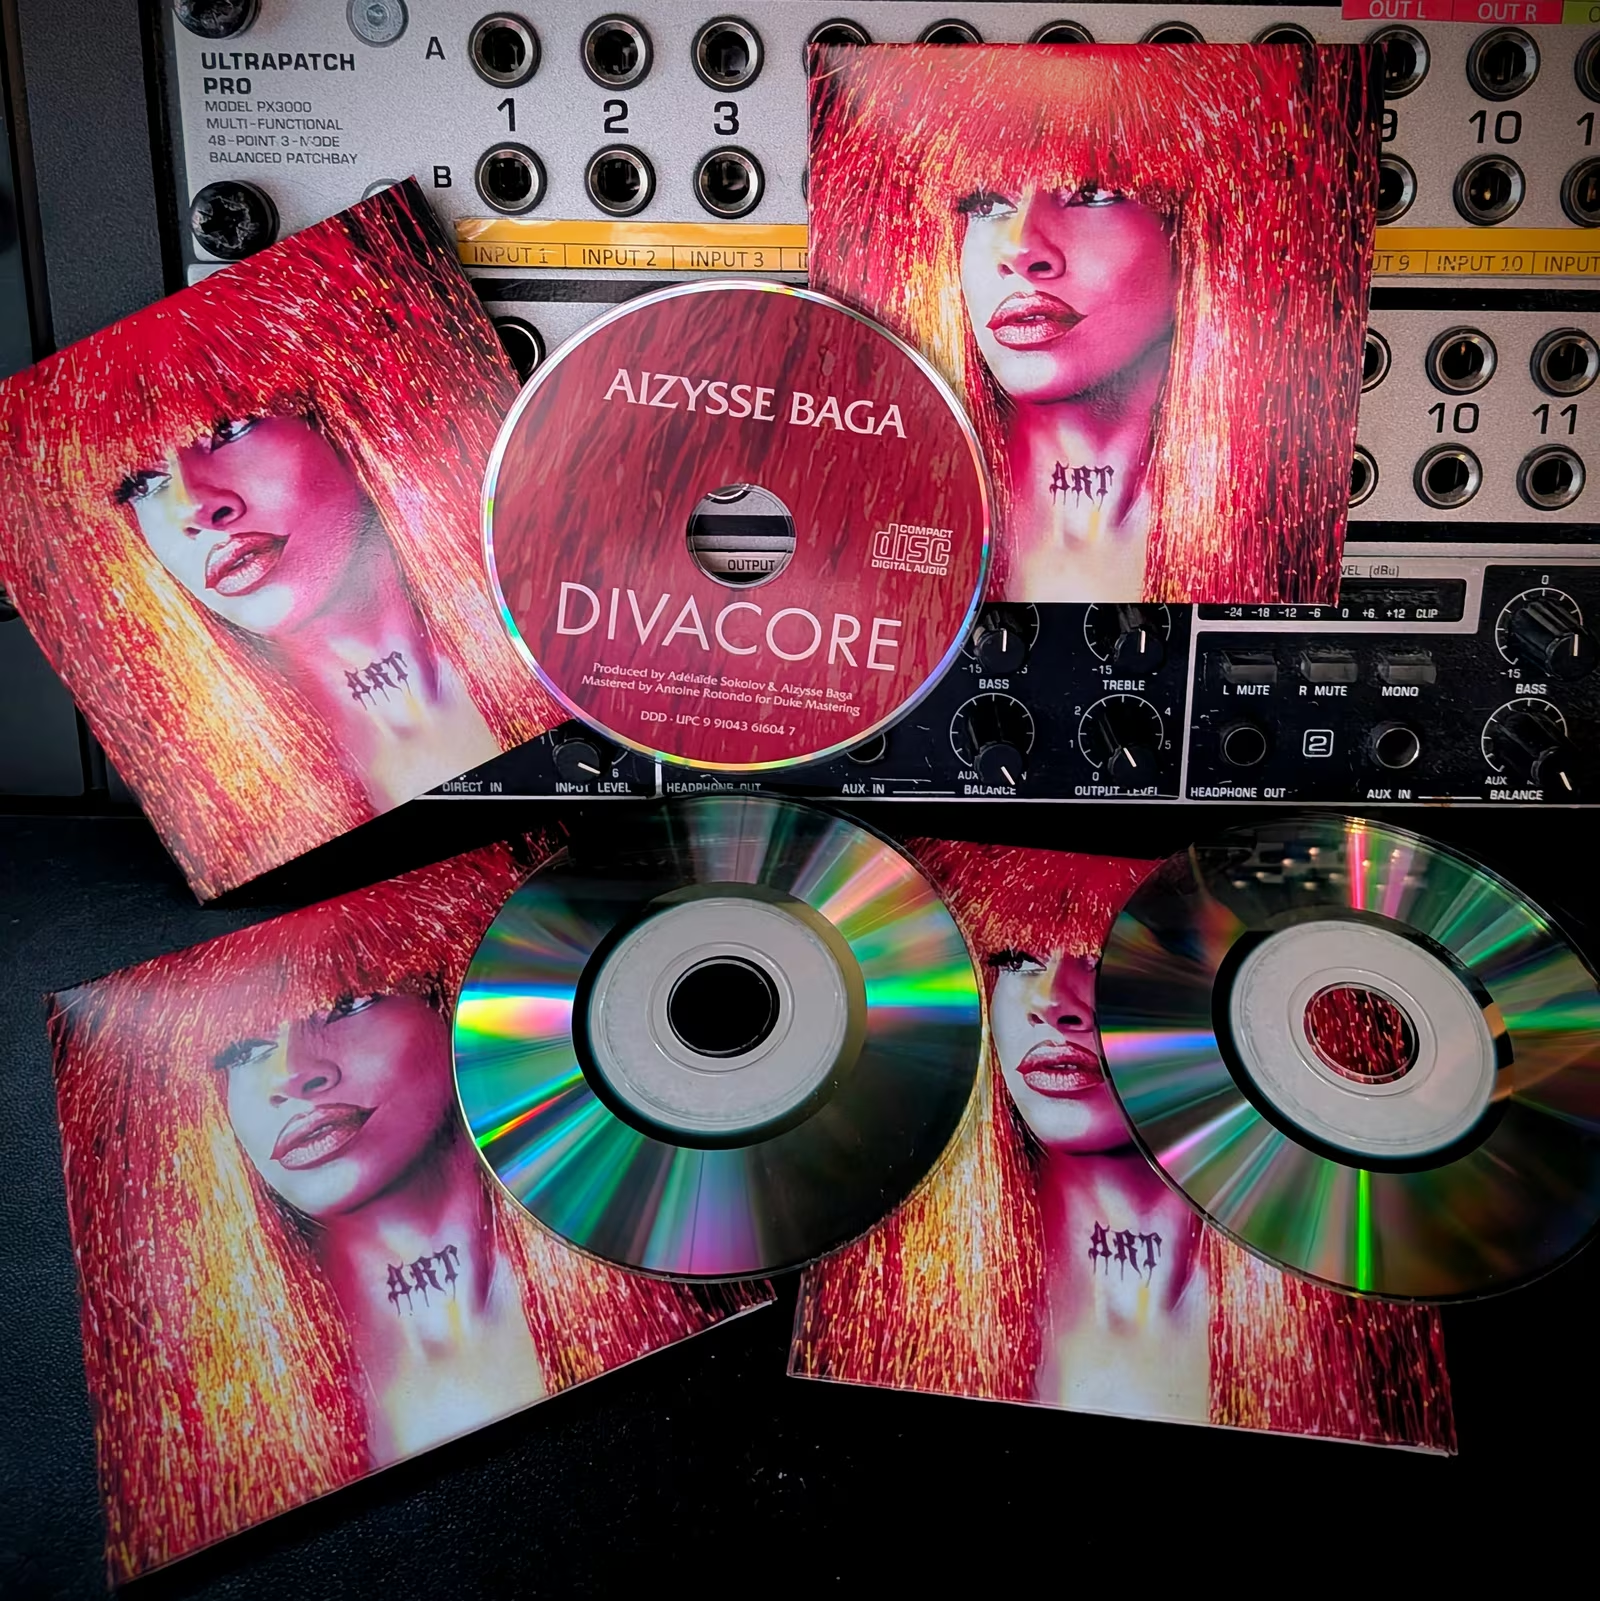
After burning our CD-R masters on a Plextor drive, we sent them to the Duplication.com plant, hoping our subcodes would survive the duplication onto Mini-CDs (nothing was less certain: they had never received such a request themselves). Only once our discs arrived home could we verify, with relief, that everything works perfectly. The discs are here, they exist, they work, and they are fabulous. The very first person to receive a copy was Adam Gashlin himself, who even insisted on buying one rather than accepting our gift, bless him for that.
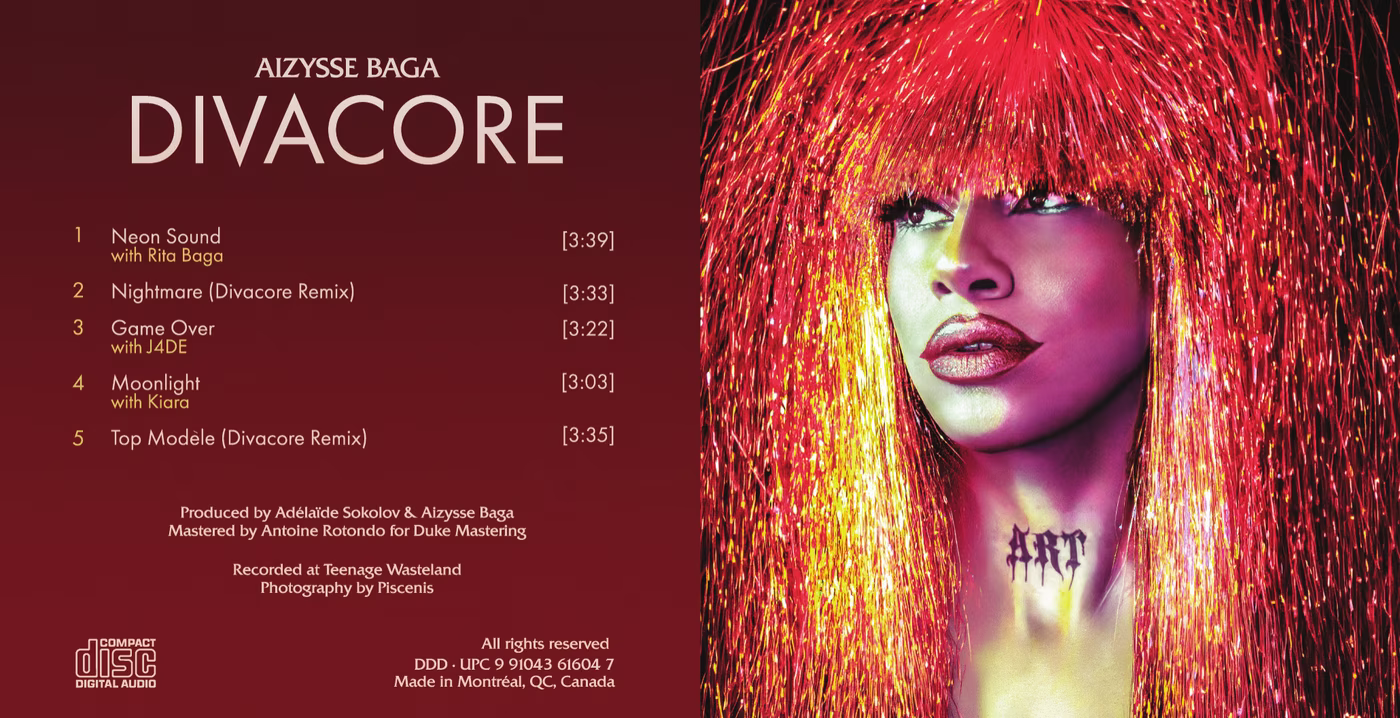
The 85mm mini-CD jacket (a touch wider than the 80mm disc it holds): tracklist and credits beside the cover photograph.
The manufactured mini-CDs, home at last.
How to see it
So you have the disc in hand, or you just want to picture what playing it is really like. What does it take to see the pictures, and not only hear the songs? You need a machine that decodes CD Graphics, and that club is smaller than you would guess. Its most common members are the dedicated CD+G karaoke machines the format was built for, like the Memorex pictured up above, and there are still plenty to be found second-hand. Then there is a surprising roster of late-80s and 90s consoles and multimedia players that quietly read CD+G off any audio disc: the Sega Saturn and the Sega CD, NEC's TurboGrafx-CD and PC Engine CD (you press the GRAPHICS button on the System Card), the Philips CD-i, the 3DO, even the Amiga CD32 and Commodore CDTV. A few of Pioneer's karaoke LaserDisc decks, the CLD-V and CLD-K models, play them too. One famous machine that does not, for all its love of CDs, is the Sony PlayStation: it plays the audio and shows you nothing.
On a computer it gets fiddlier, and the first obstacle is hardware, not software. A normal rip copies only the 2,352 audio bytes of each sector and throws the subcode away, so the graphics never even leave the disc. To pull them off you need an optical drive willing to hand back the raw R-W subcode (most modern ones will, though not all) and software that knows to ask for it; cdrdao can, and there are karaoke rippers and players that take it from there. On a Mac there is no tidy built-in route, so it stays a bit of a project. Either way, the music is the easy part; the pictures make you work for them.
And for the rare 256-color CD+EG? The hardware list is shorter still. The Sega Saturn decodes it natively, which is exactly how ours got tested; the NEC PC-FX reads only the CD+G layer beneath it, giving the 16-color version rather than the full 256; and past those you are into genuinely elusive Japanese gear, like Victor's own VS-G2 and VS-G3 decoders, from the brief window when Victor was pushing the format. If none of that is within reach, you can thank Adam Gashlin once more: his decoder turns a raw subcode dump into a video in CD+EG mode (cdg-decode), and the same engine drives the live player on his extended.graphics site. So even if a Saturn never falls into your lap, you can still watch our queens in every one of their 256 colors.
Naoki Shibata's SSRC, origin of the Shibata noise-shaping filters that fit quantization noise to the absolute threshold of hearing (see also his Project Shibatch home page)
Y. Linde, A. Buzo, R. M. Gray, "An Algorithm for Vector Quantizer Design", IEEE Transactions on Communications, vol. 28, no. 1, 1980
J. MacQueen, "Some Methods for Classification and Analysis of Multivariate Observations", Proceedings of the Fifth Berkeley Symposium on Mathematical Statistics and Probability, 1967